I apologize for the impromptu hiatus. A lot has been going on. I've been working a fair amount (for money, not on the house, which is a good thing), and between painting and cleaning and gluing spacers on the backs of our subway tile (see pic on left) and running around the Rogue Valley trying to find a remnant piece of marble for our vanity (so we didn't have to buy a slab -- expensive and way more than we need), I just haven't quite had time this week.
I'd also like to begin a mini-series to note some of the more endearing features of our house, now that I've been spending a lot of time here. In this issue, we'll look at the kitchen sink. The "In-sink-erator" garbage disposal doesn't in-sink-erate much, and by that I mean that it doesn't turn on at all, so we can't put anything solid, regardless of how miniscule, down the kitchen sink. Doing dishes is a joy. I purchased a scrubby brush on a stick, and every day or so, I run the water really hot and stuff the brush down the drain and scrub around until things drain out. Otherwise, it smells like something crawled into our drain and croaked. Charming, right? Due to the "no solids" rule, I also have to dump all solids that would go down the drain off the back steps into what will someday be a flowerbed. I'm sure the health department would have words with me if they knew about this, but I live in Oregon, and I'm calling it compost until further notice. Or until them darn coons start showin' up, at which point I'll have to get my shotgun an'....
Four coats of RL Derby Red later (see video above), we have a stunning living room. Well, it's on its way there. I still have some touch-up work to do, and we have to paint the trim and put the molding up. But the color looks fabulous. Even the greenish-silverish-brownish couch (that makes it sound so terrible; it's not, it's just a really hard-to-pin color) looks pretty good with it. The color really doesn't photograph accurately, so you're just going to have to trust me that our living room in no way resembles a tomato.
In even more news, our bathroom is now distinctly resembling a bathroom. After gobs of RedGard (don't hold me responsible if that tub manages to leak; I put tons of that goop on it), Trevor started tiling yesterday. This was after he assigned me one of the most menial tasks I've done since I worked in an office. Or ever, for that matter. Because we're doing a marble border around the top of the shower and around the window (where it's still pink in the picture), and because the marble is a different thickness than the subway tile, I had to glue little rubbery-plastic spacers onto the backs of the subway tile to make them the same thickness as the marble. (For those who don't know, subway tile is brick-shaped. Ours is 3"x6"). Three spacers to a tile. Glue, glue, glue, space, space, space, next. About 400 tiles. Also, do not burn arm with hot glue. YEOUCH!
I also spent a bunch of time trekking around, listening to country music (so many stations here!!) looking for a hunk of marble to use for our vanity top. I came up with this piece, which has much more dramatic veining than our tile does.I felt like I was living on the wild side, picking it out. Don't laugh! I could have picked a piece that matched perfectly! It was $70,coming it at $10/sf from Stone Tech. This was much better than the lady who tried to charge me $45/sf at Northwest Custom Stone. Same material and everything! Our piece is honed, rather than polished. I hear this holds up better to daily use, and when it gets scratched, it's not such a big deal. Our floor is polished, so I'm practically clashing right and left!
Friday, January 30, 2009
Tuesday, January 27, 2009
If you give a mouse a cookie...
This morning I thought I'd put some of my clothes away and get the blue room organized, since my current method of getting dressed involves fishing through the gigantic pile of clothes on the floor and employing my sense of smell. I'll say no more on that... other than it's one of the less convenient ways I've stored clothes over the years. Anyway, with the green dresser painted and situated, I carted a few loads of clothes and clutter over to our house from Todd's parents', and started putting things away, naively thinking I'd be done by lunch.
I then ran smack into what I'll call the "Sweater Phenomenon," also acceptably referred to as the "snowball effect," which seems to plague everything I try to do some days. ("Sweater" comes from that Weezer song "If You Want to Destroy My Sweater" -- it's funny, you should check it out.) The Sweater Phenomenon occurs when you want to accomplish one thing, for our purposes, putting away clothes. In order to put away the clothes, you have to find the hangers, sort the clothes, and open the overhead built-in cabinets to store the summer clothes. Since they're pretty high up, you go find the step ladder. Upon opening said cabinets, you discover at least 30 years of dirt and cobwebs and other grot, the composition of which you are not interested in, but greatly relieved that you don't have to touch. You go fetch the shop vac, and vacuum up the cobwebs. Then, you go find the Fantastik, and a sponge, and a bucket of warm water, and wipe out the cabinets. After all this, they still look dirty, so you stand on the step ladder and agonize for 10 minutes about whether to paint them, or just do it later, which is risky because it may never get done. While standing and agonizing, you look out the window, which is still quite filthy because you still haven't razored the outside of the glass. In order to do that, you have to trim back the bushes so you can get to the window. Also, it's supposed to rain this afternoon, so forget outdoor jobs. And so on. Then, after you nearly fall off the step ladder, you decide to go have M&M's (and a salad) for lunch, and whine about the Sweater Phenomenon.
Maybe this afternoon will be better. I'm not exactly optimistic, though. This house is like one giant sweater.
Monday, January 26, 2009
You've gotta be kidding...
Today, since we put it off over the weekend, I had to put the backer stuff around the window and waterproof it with some gook called "RedGard," which I was to apply with a roller. Really glop it on there, Trevor had said. Well, I am good at glopping, so I opened up the bucket, all ready to go to work with this RedGard stuff. Rather a misleading name, wouldn't you say?
Now, if you'd told me last night that I would be willingly painting another surface of my home pink, I would have laughed at you. Sadly, you would have been right. And at least for a little while, I have another pink surface. Anyway, that's all for now. I have to attempt round II of Team McDonald v. living room walls.
Sunday, January 25, 2009
Go big, or go home.
In lieu of this week's update, since nothing's changed in the bathroom since the last post and the only thing different in the rest of the house is that it's messier, I'm posting what we decided to do this afternoon.
So after we primed, it looked like this:
Because the primer is tinted pink (to help the red come through in fewer coats, just like for the blue room we used gray primer) we had to put a coat of red on tonight too. When we started and the primer was still showing, it looked like the one of those boxes of elementary school valentines rounded up all his buddies and attacked our living room. Violently. Since pink is my least-favorite color ever, and I couldn't tolerate the idea of even one day of looking at pink walls, I sort of insisted that we paint one coat tonight. So we did, and now it's looking approximately like this:
But remember, it has much more of a cool feel. It is NOT NOT NOT tomato-red. Car fanatics will understand when I say it looks much more like a Honda/Acura red and not like a BMW or the shades Mustangs were unfortunately painted a few years back.
Anyway, that's all for tonight, folks. Stay tuned for deeper red shades, or deeper shades of regret. I suppose a few more coats will tell.
A few days ago, a 10%-off coupon from Home Depot came in the mail, so we went on a shopping spree there yesterday. Among our purchases: two gallons of pink-tinted Kilz2 primer and three gallons of Ralph Lauren Derby Red (the color you get if you Google it is NOTHING like our color, so even if you do have an awful lot of time on your hands, I wouldn't recommend bothering using it like that). Rather on a whim (much like how the bathroom went) we decided to paint this afternoon/evening. Todd's dad generously helped with the primer, which made things clip right along.
You may remember that our living room looked like this before:
So after we primed, it looked like this:
Because the primer is tinted pink (to help the red come through in fewer coats, just like for the blue room we used gray primer) we had to put a coat of red on tonight too. When we started and the primer was still showing, it looked like the one of those boxes of elementary school valentines rounded up all his buddies and attacked our living room. Violently. Since pink is my least-favorite color ever, and I couldn't tolerate the idea of even one day of looking at pink walls, I sort of insisted that we paint one coat tonight. So we did, and now it's looking approximately like this:
But remember, it has much more of a cool feel. It is NOT NOT NOT tomato-red. Car fanatics will understand when I say it looks much more like a Honda/Acura red and not like a BMW or the shades Mustangs were unfortunately painted a few years back.
Anyway, that's all for tonight, folks. Stay tuned for deeper red shades, or deeper shades of regret. I suppose a few more coats will tell.
Saturday, January 24, 2009
Drywall!
Before we get into house progress, last night was the first night we had dinner that we cooked here! Since we still don't have a stove (no gas yet) I crock-potted a chicken (a whole one, which I've never done before...it was interesting...) with some potatoes and carrots and stuff. Other than being something of a small milestone (eating dinner other than takeout, frozen buffalo chicken strips, and toaster-oven fare of toasted cheese and...umm...toast) it turned out pretty good.
I spent part of yesterday trying round two of washing the windows. A few weeks ago, I tried warm soapy water, which was a failure. Yesterday, I tried a combination of baking soda and white vinegar, to remove what I believe are lime or calcium or something deposits. No luck. So after being green didn't work, I tried chemicals. CLR has never failed me in the past, and I'm pretty sure you could dissolve your finger off with it, but it didn't budge the white junk on the windows. Annoyed, I complained to Kate and Trevor while we were eating lunch. Trevor took one look at it and stated that I'd have to razor it off. Yippee. I tried it later, and it worked like a charm, of course. Now I have a few hundred square feet of glass to scrape with a razor. At least some day the windows will be transparent, and not merely translucent.
Yesterday was also a big turning point in the appearance of the bathroom. Here's a little video detailing that:
We helped Trevor (a little) with the drywall. Hanging it was insanely hard; I would never want to meet a drywaller in a dark alley. Between the drywall and the backerboard in the shower, it's starting to look bathroom-y. Or at least somewhat less like a shack where the commode consists of a hole in the ground and a few leaves if you're lucky.
We're supposed to give the drywall screws another coat of hot mud, put backerboard around the window sill, and waterproof the living daylights out of everything before Trevor comes back on Tuesday. And then, we tile! A week or so from now, we might (maybe, possibly, hopefully) have a finished bathroom, and consequently, we will be able to move in!!
Thursday, January 22, 2009
Are you sick of the bathroom yet? I am.
In the past two days, the space that once housed the tub, toilet and vanity has started looking like it might actually be a bathroom once again. Yesterday Trevor laid cement backer-board on the floor, so the sub-floor is covered, and those chilly crawlspace drafts we loved so much have been eliminated. Here's how things are looking, as of this morning.
As things go, though, he had to bust out the window in the bathroom to replace it, so we covered one draft hole and made another. At least he's supposed to be done with that today.
The window (and the door/window combo in the office) presented some issues. The flashing is pretty deep underneath the siding, and apparently our house had gigantic (like 8-inch-wide) trim back when it had wood siding (it's now covered by aluminum, and the two layers is why we think we are sidestepping $300/month gas bills). I was only around for part of the window removal, but there was lots of grunting and muttering and cries of "oh, for the love!" so I got the idea it wasn't going the greatest.
On the topic of the window, Trevor dug it up at Lowe's...another hit! Without time to special-order one, we were going to have to go with one that was 4' high that someone had laying around, instead of the 3' that the current space is, which wouldn't be a problem, except that it had to go down, not up. So what I'm describing here would have been a 4x3.5' space, clear glass (as opposed to opaque for bathrooms), starting approximately a foot above where the tub ends, right in the middle of the shower to the back yard. I mean, the important thing is that your knees are covered while you're showering, so at least nobody sees that when they're looking through that back window. Yeah. Good thing we found the other one. We're planting some bushes that will both shade the air conditioner (thus reducing the load on it and allowing it to operate more efficiently) and obscure the view into the shower without blocking the light, which is so lovely from that southern exposure.
I put the second coat on the formerly green dresser (picture included). In typical fashion, I was lazy and didn't paint the feet. I don't even know why. Now I have to figure out what to do about that.
I'm not going to say I'm crazy about the color, but I do like it. It's somewhat more gold than I would have liked, but I think it looks good with the blue. That's a good thing, because a) I am NOT sanding, priming and painting it again, and b) I am really excited about my vision for the dining room. (The plan is to put in a chair rail, paint an intense royal blue below the chair rail, paint Great Hall Cream above the chair rail, and then stencil this damask pattern in royal blue on the cream. Then crown molding, of course. Probably Behr Antique White like the rest of the house, but maybe something a little more true white.
Tuesday, January 20, 2009
Staying busy
Sorry I'm late on the update. That was prompt, wasn't it. Here it is:
This past weekend, Eric started the plumbing for the tub, toilet and sink. It was especially easy for him, because Trevor cut this convenient hole in the sub-floor:
We also discovered -- hold onto your hat for this one -- more asbestos tape. I realize the true weight of this reference might be lost on you...we had an exceptionally, overzealously dedicated duct cleaner tell us that because of the small quantity of asbestos tape on some of our ductwork, we'd have to get the entire system redone, and, for some reason we still haven't figured out, move the newly installed furnace to the attic. This was to the tune of $15,000, in his pocket, naturally. We now joke about asbestos all the time, and provide charcoal respirators to all guests. HA.
You may also notice in the shot above that the bathtub, the 600-pound-plus cast-iron tub, is gone. Boy, was that a beast to get rid of. It's sitting in the southeasterly quadrant of the picture to the right, after we kind of tipped it out the back door.
Our vanity is under construction right now, and I am extremely excited to see how it turns out. I also picked up lighting for over the vanity yesterday, from -- shocker -- Lowe's. (I usually have terrible experiences there, but I was desperate to not special-order our bath bar because our electrician is coming tomorrow. Consequences of poor planning...) Ours is a three-light, but (not surprisingly) Lowe's doesn't have that on their website. Chrome is apparently "going out of style" so it's really hard to find.
I'm also in the process of painting the green dresser. It's primed, and it's going to be Ralph Lauren's Great Hall Cream, which is also one of the dining room colors. It'll be my first try with this color, and I'm soooo excited to see how it looks. Since it's a metallic (!!) it doesn't exactly translate well onscreen. But it's a warmish champagne, minus the mid-80s Buick associations. It's going in the blue bedroom, and it is high priority to get done so that I can start moving some of my clothes out of the bookcase they've been living in for the past seven months.
Yes, we do still have the Christmas tree up. It is bone dry, decidedly a fire hazard, but the room always looks so sad when it gets dumped. This is my first time having my own Christmas tree, and since it always depressed me to get rid of it, I'll do it when I'm good and ready. Or when Todd makes me.
This past weekend, Eric started the plumbing for the tub, toilet and sink. It was especially easy for him, because Trevor cut this convenient hole in the sub-floor:
We also discovered -- hold onto your hat for this one -- more asbestos tape. I realize the true weight of this reference might be lost on you...we had an exceptionally, overzealously dedicated duct cleaner tell us that because of the small quantity of asbestos tape on some of our ductwork, we'd have to get the entire system redone, and, for some reason we still haven't figured out, move the newly installed furnace to the attic. This was to the tune of $15,000, in his pocket, naturally. We now joke about asbestos all the time, and provide charcoal respirators to all guests. HA.
You may also notice in the shot above that the bathtub, the 600-pound-plus cast-iron tub, is gone. Boy, was that a beast to get rid of. It's sitting in the southeasterly quadrant of the picture to the right, after we kind of tipped it out the back door.
Our vanity is under construction right now, and I am extremely excited to see how it turns out. I also picked up lighting for over the vanity yesterday, from -- shocker -- Lowe's. (I usually have terrible experiences there, but I was desperate to not special-order our bath bar because our electrician is coming tomorrow. Consequences of poor planning...) Ours is a three-light, but (not surprisingly) Lowe's doesn't have that on their website. Chrome is apparently "going out of style" so it's really hard to find.
I'm also in the process of painting the green dresser. It's primed, and it's going to be Ralph Lauren's Great Hall Cream, which is also one of the dining room colors. It'll be my first try with this color, and I'm soooo excited to see how it looks. Since it's a metallic (!!) it doesn't exactly translate well onscreen. But it's a warmish champagne, minus the mid-80s Buick associations. It's going in the blue bedroom, and it is high priority to get done so that I can start moving some of my clothes out of the bookcase they've been living in for the past seven months.
Lastly, I'm pleased to announce that we gave the fireplace a first run on Friday. To honor the legacy of the fireplace, we burned a cardboard box first. Since the only wood we have at the moment is the green stuff I chopped down a few weeks ago, things didn't exactly go well after the cardboard flamed out. It looked nice, though:
Yes, we do still have the Christmas tree up. It is bone dry, decidedly a fire hazard, but the room always looks so sad when it gets dumped. This is my first time having my own Christmas tree, and since it always depressed me to get rid of it, I'll do it when I'm good and ready. Or when Todd makes me.
Friday, January 16, 2009
Three bandaged fingers, two broken nails, and a partridge in a pear tree
Since my fleeing the attic a few days ago, I was successful in cleaning things out up there. Granted, I had to bring Rudy (the in-laws' 85-pound dog) to keep me company, but it's done.
Yesterday, I also picked up the tongue-in-groove pine paneling that I'm going to use to put a chair-rail height border around my office. It will be painted white. I was inordinately proud that my roof-rack bungee job held firm about five miles home. I did upset quite a few drivers behind me for going going ten under the speed limit and accelerating even slower than usual, but if I'd been in California, I'd probably be dead (some kind soul having shot me), so I consider the trip a success on all fronts. I love bungee cords.
This weekend, our plumber friend Eric will be doing all the plumbing stuff for the bathroom. I had hopes for installing a system that would use graywater (drainage from the sink or bathtub) to flush the toilet or water landscaping, but after doing a little research, I've concluded that a little more planning may have been useful for such an undertaking. It's apparently not so easy, plus you have to be really careful about using biodegradable soap and stuff. The book Todd's aunt gave us for Christmas about green remodeling has green-brainwashed me into entertaining all sorts of interesting methods of efficiency and conservation.
Speaking of conservation, we're using Trevor's blowtorch to light up our first fire in our fireplace tonight! Burning things is almost as much fun as smashing them with a sledge hammer.
This week has been mainly devoted to the bathroom. Trevor and I both took turns ripping it apart, and it turned out like this:
After I removed the mirror (which I did before wielding the sledge hammer) I had to take a picture of what was behind it. In addition to the pink, check out the texture of that dust. I really thing I could have measured depth, like 1/8-1/4 inch or so. They don't make it like that anymore.
I made a lot of phone calls to find our best price for the Carrara marble tile we decided to use on the floor. After a fair amount of deliberation, we decided to use marble even though everybody says it's fragile. Todd's going to try really hard to not wear his high heels in the bathroom, and I will not drag my sledge hammer around after demolition is complete. I can't figure out what bare feet could possibly do to stone, though I do suppose I will have to remember to trim my two-foot-long toenail... Everywhere else in the valley was turning up $9.95/sf (yikes) for the marble, except Home Depot, which is $3.99/sf. Guess where we're getting it....
We also priced out radiant flooring, which came in at about $250 with the programmable thermostat. It's now available as an electric net, so it can be cut and flipped around to fit the space. That's a lot handier than having to lay a slab of concrete and lay a hydronic system, and it will be quite nice on those chilly mornings!
The vanity is underway, and it's going to look like the picture I posted last week. Trevor nabbed a sink for $35, which is great. I don't know anything about it, other than it's white, and I'm pretty sure it's porcelain. I find the less I know about things, the better. Before the idea of a soaker tub crossed my mind, we would have ended up with a $50 tub from Builder's Bargain. Sometimes knowing your options isn't the best thing. The fan, pictured, falls into the category of tolerably tacky. It's better than the one that looked like a modernist's interpretation of a magic carpet ride.
Yesterday, I also picked up the tongue-in-groove pine paneling that I'm going to use to put a chair-rail height border around my office. It will be painted white. I was inordinately proud that my roof-rack bungee job held firm about five miles home. I did upset quite a few drivers behind me for going going ten under the speed limit and accelerating even slower than usual, but if I'd been in California, I'd probably be dead (some kind soul having shot me), so I consider the trip a success on all fronts. I love bungee cords.
This weekend, our plumber friend Eric will be doing all the plumbing stuff for the bathroom. I had hopes for installing a system that would use graywater (drainage from the sink or bathtub) to flush the toilet or water landscaping, but after doing a little research, I've concluded that a little more planning may have been useful for such an undertaking. It's apparently not so easy, plus you have to be really careful about using biodegradable soap and stuff. The book Todd's aunt gave us for Christmas about green remodeling has green-brainwashed me into entertaining all sorts of interesting methods of efficiency and conservation.
Speaking of conservation, we're using Trevor's blowtorch to light up our first fire in our fireplace tonight! Burning things is almost as much fun as smashing them with a sledge hammer.
Monday, January 12, 2009
The Attic.
I have an embarrassing confession to make. This afternoon after I finished putting a coat of primer on my desk, I screwed up all my courage and headed upstairs with my trusty shop vac with intentions of getting rid of the monstrous cobwebs in the attic off the east bedroom closet, which I want to use this space as storage for Christmas decorations and stuff. I find the upstairs totally creepy, and at first completely refused to go up there alone, especially if I was the only one home. It's something about the combination of the naked light bulb hanging from the ceiling in the landing and the wallpaper and how dark it is...I'm not sure. But it's creepy.
Anyway, I gave myself a little talking-to about how fearing the upstairs is not only ridiculous, it's very embarrassing for an adult, and up I went. I vacuumed for about two minutes, feeling confident that I'd conquered the fear of the attic. I even squat-hopped out of the closet and into the attic (you walk through the bedroom and into the closet and there's a little door to the attic from there). Cobwebs were disappearing like crazy and it was starting to look halfway decent.
Then, behind me, the light in the closet flickered. I paused for a second, took a deep breath, and willed myself to keep vacuuming. Then the light flickered again, and I looked around and realized I was all alone in a totally creepy attic with cobwebs everywhere, and I switched off the vacuum and the light and beat it downstairs as fast as I could. Sitting down here where it's cozy and warm, I feel a bit silly. But there is NO WAY I am going back up there again, not by myself anyway.
Sunday, January 11, 2009
January 11 update
Here's a little recap on what we've accomplished this week. It was a pretty productive week, especially the last three days of it.
Today I also cleaned out the fireplace, which was a delightful task. I sucked out half a shop vac's worth of old brick, leaves, ash, rocks, and (proving that the old codger did burn his garbage as the neighbors alleged) some plastic-y foil wrappers. Then I noticed the hole in the back of the fireplace, and, putting two and two together, went outside and opened the little door at the base of the chimney. I dug somewhere between five and eight gallons of ash and cinders out of the tunnel between the fireplace and the door. It just kept coming. Gary (the chimney guy) and I agreed that it was a minor miracle that this place hadn't burned down, given the old man's negligence.
Saturday, January 10, 2009
Demolition Barbie: Sledgehammer and Crowbar Included!
Remember how I mentioned a few days ago that we were going to redo the bathroom? Well, it's underway. Here's a little video of what it looked like before (that's right, there's a....um...next step. Not an after. Yet.)
Sorry that it's sideways. I couldn't really get the right angle landscape...It's totally good for you to bend your neck like that. Ask any chiropractor....
Later that afternoon, my hands were throbbing from holding a hammer for so long and kept pinching together like crabs with muscle spasms. And this is what I'd accomplished:
While I was at work smashing the bathroom to bits and throwing it out the window, Trevor the Great was in the next room over, ripping out the old sliding glass door that closed crooked and was so dirty it wouldn't get clean. (That's a special kind of dirty, for those who don't know. Specifically, this kind of dirty doesn't respond to any cleaning efforts, regardless of the quantity or variety of chemicals used.)
Before:
Again, sorry for the rotation. I kind of suck at this. Be sure to notice Trevor making a war-face as he attacks the frame of the door. We discovered flashing on the door (and by "we" I mean "he," because my understanding of flashing has little to do with siding and whatnot) and he had to use his Sawzall (excellent tool, by the way) to saw around the frame of the door. He was less than pleased about the situation. But nevertheless, the door was gone before lunchtime. And before dinner, this is how it looked:
Sorry that it's sideways. I couldn't really get the right angle landscape...It's totally good for you to bend your neck like that. Ask any chiropractor....
Later that afternoon, my hands were throbbing from holding a hammer for so long and kept pinching together like crabs with muscle spasms. And this is what I'd accomplished:
Basically, I eat 2x4s and plaster for lunch. Cat, be sure to mention to your chauvinist friend that I am rather handy with a sledge hammer.
While I was at work smashing the bathroom to bits and throwing it out the window, Trevor the Great was in the next room over, ripping out the old sliding glass door that closed crooked and was so dirty it wouldn't get clean. (That's a special kind of dirty, for those who don't know. Specifically, this kind of dirty doesn't respond to any cleaning efforts, regardless of the quantity or variety of chemicals used.)
Before:
Again, sorry for the rotation. I kind of suck at this. Be sure to notice Trevor making a war-face as he attacks the frame of the door. We discovered flashing on the door (and by "we" I mean "he," because my understanding of flashing has little to do with siding and whatnot) and he had to use his Sawzall (excellent tool, by the way) to saw around the frame of the door. He was less than pleased about the situation. But nevertheless, the door was gone before lunchtime. And before dinner, this is how it looked:
I put the deadbolt and the knob on today, and it's not trimmed out in the picture either. I'll take another shot tomorrow. It's kind of dark out now. I'm not wildly in love with how it looks, but it's definitely an improvement over the semi-translucent door that was there. This has actual light shining through.
While I was installing the deadbolt (tricky thing, and the directions were just pictures. Not helpful, Kwikset!) Todd and Adam worked on cleaning the gutters and getting rid of the satellite dishes (two...who needs two?) on the roof. We took the plastic covering off the fireplace (which was up while Gary was banging around in the chimney. We didn't really want a bunch of ash in the living room) and I vacuumed out the firebox, opened the little door on the outside of the chimney, and shoveled out another four gallons or so of ash.
Fast forward to a few hours later, and you find me, sitting on the couch in front of the fireplace. Now, I know this doesn't sound like a big deal, but it kind of is. This is the first time I've sat around and done something other than scheme for the next project or make a list of stuff to get from Home Depot. It's starting to become home!
I'll sign off tonight with one more video. This is a definitely outdated tour of the inside of the house, before the floors were even done. I'll post a more current one soon, but here's a "before":
Thursday, January 8, 2009
SUCCESS!
I spent the better part of Tuesday and Wednesday listening to obnoxious country music and putting the kitchen together. Since our appliances came and that obscene pink monstrosity is gone, I can tolerate being in the kitchen. Unpacking is a lot like Christmas, except that since I know what I packed to begin with, I know I'll like it. Shockingly, with our stuff settled in, I don't mind the kitchen that much. Don't get me wrong, I've been tirelessly plotting the remodeling plans, but I think it'll be okay for a few months. After things came together, this is how it looked:
I also think bathroom plans might be coming together (cross your fingers). I found a tub that wasn't in stock, according to Home Depot's website, but the store begged to differ. I think we're going to go with a deeper soaking tub (not a whirlpool), and I'm pretty sure that it will be the Kohler Devonshire in white. I though about the Archer, which was $20 cheaper, but they don't tell you that you have to use the $100 Kohler drain thingy, which made it a lot more. Sneaky. We also were considering an Aqua Glass because they make a soaker that costs half of what the Devonshire does, but then I read they crack. So here's my review of the Aqua Glass Eleganza: given that pretty much the only purpose of a tub is to HOLD WATER, that sort of disqualifies it.
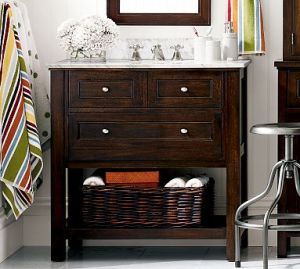
I met with a custom cabinet guy yesterday to duplicate this vanity for the bathroom. I was hoping to go with a lacquered white finish, but he said it would be significantly more expensive and take a lot more time than just staining it, so...maybe I'll get white cabinets in the kitchen.
I think we're going to go with this faucet. Kind of a fun style, huh? Another Home Depot find, knocking off the Pottery Barn. (Really, where do they get off charging $300 for a faucet? It's a FAUCET. It either works, or it doesn't. There aren't really features...)
The only thing that's presenting some trouble is flooring. I'd love Carrara marble (see pic) except that I don't want the whole bathroom to look like a cold tomb. Travertine looks warmer, but I don't want it to clash with the marble, since the marble's a gray tone, and the travertine (in ivory) would be more of a warm off-white. Porcelain is also an option; the ones I looked at looked so much like stone that I couldn't tell the difference till the guy told me.
Monday, January 5, 2009
Out with the old...
Over the weekend, Todd and I waged war on the crown molding in the blue bedroom. It was supposed to take a few hours, and it easily took eight. It did not feature the crisp, neat corners I was hoping for. Actually, it didn't feature corners at all. It featured two pieces of molding jamming into each other at awkward and unsightly angles. Trevor had to come finish the rest of it, which he (naturally) did in about a half hour, much to our rather pained delight.
Our problems began with having two ever-so-slightly different sizes of molding. This, my friend, is why you only buy certain things from Builder's Bargain Center (Southern Oregon's very own scratch-and-dent Home Depot). Also, the walls are crooked, which I expected but got really confused about how to compensate for. My little miter box saw let me down, miserably. But Trevor left his compound power miter saw at the house, so I will be well-equipped for next time.
Also over the weekend, we got new appliances! I didn't take pictures in the kitchen yet, but let us all take a moment to bid a fond farewell to the old stove:
All together now, YUM! You got your forty-year-old bacon grease, some scrambled eggs, potato bits--that's breakfast!
Saturday was a beautiful sunny day, so I also spent some time outside pruning the camellias back from the house (so they don't rub on the siding), and hacking back the huge, ugly juniper bush that was taking over our driveway.
Sunday morning, we were talking about what to replace the bathroom carpeting with (it's gross--I'm sure you're shocked...seriously, who carpets a bathroom!?) and then one of us said, "Why don't we just redo the bathroom before we move in?" So we had a meeting with Trevor, who's going to be redoing the bathroom, and decided we might be able to start next weekend! Lest you think this is spur-of-the-moment, we've been planning the bathroom since we bought the house. We have materials pretty well chosen (some combination of off-white subway tile, travertine, a Carrara-marble-topped vanity, electric-net-heated floor...) and I have to go find a tub this week. I'm meeting with a cabinet guy tomorrow; we might have our vanity custom-made to fit the rather specific 40-inch space. I found something that's almost perfect from the Pottery Barn, but it's for the less-than-perfect price of $1500. So I'm going to see if I can get a knock-off custom made for around $1100 less. If everything falls into place, we might (just maybe) have our downstairs bathroom redone in two weeks!
On the list for today: putting away dishes in the kitchen (which Kate so generously cleaned for us. What a champ!) and putty-ing the molding so it doesn't look like a blind carpenter tried to hang it while sleepwalking.
Also, here's a video that's exciting. Or it was, woulda been, like three weeks ago when it was current....
Our problems began with having two ever-so-slightly different sizes of molding. This, my friend, is why you only buy certain things from Builder's Bargain Center (Southern Oregon's very own scratch-and-dent Home Depot). Also, the walls are crooked, which I expected but got really confused about how to compensate for. My little miter box saw let me down, miserably. But Trevor left his compound power miter saw at the house, so I will be well-equipped for next time.
Also over the weekend, we got new appliances! I didn't take pictures in the kitchen yet, but let us all take a moment to bid a fond farewell to the old stove:
This is what it left behind for us. Fond memories, really...
All together now, YUM! You got your forty-year-old bacon grease, some scrambled eggs, potato bits--that's breakfast!
Saturday was a beautiful sunny day, so I also spent some time outside pruning the camellias back from the house (so they don't rub on the siding), and hacking back the huge, ugly juniper bush that was taking over our driveway.
Sunday morning, we were talking about what to replace the bathroom carpeting with (it's gross--I'm sure you're shocked...seriously, who carpets a bathroom!?) and then one of us said, "Why don't we just redo the bathroom before we move in?" So we had a meeting with Trevor, who's going to be redoing the bathroom, and decided we might be able to start next weekend! Lest you think this is spur-of-the-moment, we've been planning the bathroom since we bought the house. We have materials pretty well chosen (some combination of off-white subway tile, travertine, a Carrara-marble-topped vanity, electric-net-heated floor...) and I have to go find a tub this week. I'm meeting with a cabinet guy tomorrow; we might have our vanity custom-made to fit the rather specific 40-inch space. I found something that's almost perfect from the Pottery Barn, but it's for the less-than-perfect price of $1500. So I'm going to see if I can get a knock-off custom made for around $1100 less. If everything falls into place, we might (just maybe) have our downstairs bathroom redone in two weeks!
On the list for today: putting away dishes in the kitchen (which Kate so generously cleaned for us. What a champ!) and putty-ing the molding so it doesn't look like a blind carpenter tried to hang it while sleepwalking.
Also, here's a video that's exciting. Or it was, woulda been, like three weeks ago when it was current....
Sunday, January 4, 2009
Decidedly late.
I had intentions of writing about all our adventures in houseland, but then upon returning from Thanksgiving in Chicago, I got a little busy. In the shuffle of moving, the video of the inside of the house got moved to an external hard drive, which is....somewhere. But here's what the outside looks like:
[
In particular, Trevor (Todd's sister Kate's husband, who also happens to be a brilliant craftsman and our general contractor) and I spent nearly a week acquiring a much more intimate knowledge of the then-unfinished red oak and red fir floors of this house than I ever had any desire to.
Trevor took the lead on the project, renting the machines, whining about how expensive they were and getting us a better deal, sanding for days, and applying the clear oil-based polyurethane we decided to go with. I pulled carpet tacks, vacuumed, helped sand, breathed a lot of fumes from our propane shop heater (these were the pre-heat 40-degree-on-a-warm-day days), breathed a lot of mineral spirit fumes, and pointed out puddles of poly as Trevor applied. After the sanding sealer was put down, we saw how the floors would look at the end. I was amused to discover that they look exactly like some other wood floors I'm familiar with: those of my parents' house.
When I wasn't breathing fumes and getting in Trevor's way, I spent my time in the back bedroom, an approximately 12x12 room that Todd and I will use until Phase II of renovation (the still-under-committee-review upstairs dormer window). The back bedroom sported at least three, and in some places four, layers of wallpaper. After doing my research, I tried several methods of wallpaper removal. In the end, I settled on a combination being the best.
After peeling off as much dry paper with a putty knife as I could (which was remarkably therapeutic), I scored the surface with a PaperTiger so that the solution and steam could penetrate more deeply into the paper. Then, following Mom's advice, I mixed up a batch of warm water and cheap fabric softener. The problem with this was that my solution was originally too weak. You'd probably want a 1:1 or 2:3 ratio of water to fabric softener. This I sponged onto the roughed-up wallpaper. Sidenote: this is pretty messy work. I used long dishwashing gloves and put down drop cloths. When buying drop cloths, buy thick ones. I got a few that are canvas on one side and pvc-rubber on the other. The paper and glue that comes off the walls is messy and gloppy, and it makes cleanup easier if it's not all over your floors. I tried to work in sections of about five lateral feet at a time (we have eight-foot ceilings) and not work too far ahead of myself. If you bite off more wall than you can chew, it just ends up drying before you get there. No harm done, just a little work wasted.
After letting the fabric softener solution soak for a few minutes, my Wagner Steamer was boiling and spitting water everywhere, so we were ready to go. (Another sidenote: I thought I'd be smart and mix a little fabric softener in the steamer. It kind of worked, but it dribbled tons of water everywhere. I figured it wasn't best for the baseboard or the carpet, so I quit. If you're on a tile surface though, you might consider it. I also don't know if it could break the steamer or not...try at your own risk.) I used the large steam plate most of the time (about 8"x11") and held it to the wall for 20-30 seconds. The key here is working slowly. We used the mini-steamer (which Todd referred to as "purse-sized") for trim along windows or small areas; it works much faster because it's more concentrated.
For cleanup, I found it worked best to a) wear gloves when picking up all the wet, gloopy wallpaper, and b) leave it overnight to dry a bit and do cleanup in the morning when you start again. I know it runs contrary to cleaning up messes after you make them, but if you can do this, it makes the whole thing more pleasant.
After the walls were done (two weeks after I started; it was probably about three or four full days) I wiped them down, knocked off any leftover bits of glue, spackled all the holes, opted to leave the quarter-sized chunks of plaster that had fallen off the top of the ceiling on one wall in favor of crown molding, and prepared to paint.
Here's what that looked like, pre-paint. Wahoo!!
I put on my painting clothes and marched down to our friendly Home Depot. $85 later, I was headed home with brushes, rollers, two gallons of gray Glidden Gripper (tinted for dark colors), two gallons of Behr flat enamel in Sailboat, and grand plans of having a painted room by sundown. Life happens to plans, though, and Todd and I were happy to have gotten one coat of primer up by bedtime.
Primer-ed, the room looked like this:
One coat of paint in, we were all a bit worried. The supposedly navy Sailboat looked like this....
I was still happy though.
One week, three rollers, and an extra gallon of Sailboat later, we were positively ecstatic to have a room that looked something like we'd envisioned. Several lessons learned:
1. They tell you to tape off trim every coat. We cheated. We did every other. I got away with this by using a very sharp utility knife to razor the edges before taking the tape off. I don't exactly recommend this method, but if you're impatient and ok with a bit of imperfection, then it'll be just fine. I can't even see where I did it now.
2. Paint in daylight, especially with dark colors. There was blobby paint, visible only after it was dry. This I remedied with a little 150-grit sandpaper before the last coat. Everything looks great now, but you just can't see what you're doing without bright natural light.
3. Just use new rollers. Maybe I'm the dummy here, but it seems like we made a bigger mess trying to save our rollers.
In the rest of the month or so since we closed, Trevor has redone the fireplace with red brick (that we got a great deal on--clearance!!), our chimney guy, Gary Matheney of Jacksonville, OR, has been hard at work fixing the chimney and replacing the flue liner, Metal Masters installed our new gas furnace and air-conditioner, the floors are dry, we moved all our stuff in the weekend before Christmas, we're buying furniture, our electrical service was upgraded to a 200-amp breaker box (from a 60-amp double-tapped fuse box), and we have a local phone number. I also cut down a dead tree (which our wonderful neighbor chopped up for us), we raked several months' worth of oak leaves, bought and painted molding for the bedroom, ordered a new door for the crooked slider, and we almost installed a new front door. We've been busy.
Subscribe to:
Posts (Atom)